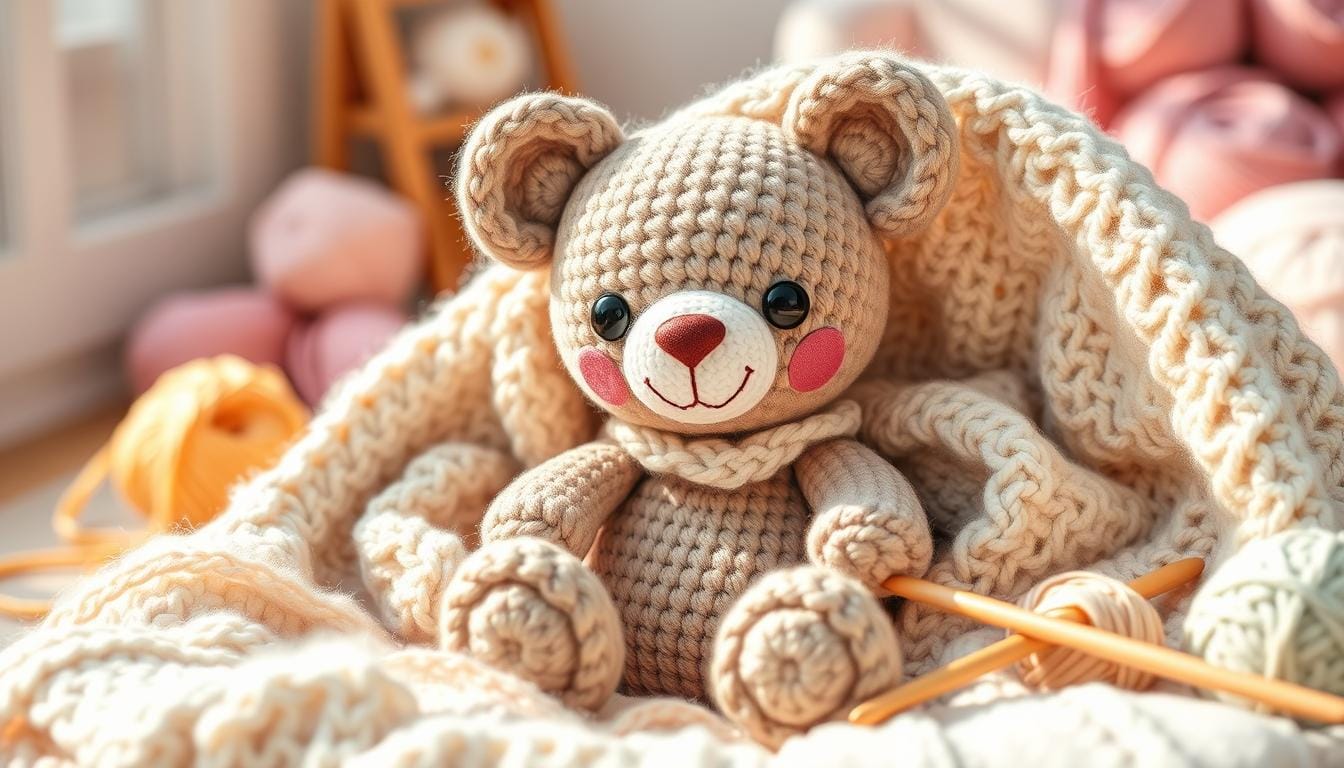
Super Cute Free Little Bear Amigurumi Crochet Pattern Project
Explore the adorable world of the Little Bear Amigurumi Project. It’s a free crochet pattern that will win your heart and keep you busy. This pattern uses level 4 worsted weight 24/7 Cotton Yarn. It’s a fun addition to your crochet collection.
With a 2.75 mm Clover Amour Hook and 7.5 mm safety eyes, you can make cuddly friends. These friends will bring warmth and personality to your life.
The pattern has a unique design. It uses continuous rounds, invisible decreases, and special bobble stitches for the arms, legs, and tail. You can make it your own by choosing different colors and textures.
Table of Contents
Introduction to No-Sew Amigurumi Bear Making
Start your journey into the world of no-sew amigurumi bear making. It’s a great choice for beginners and those looking for easy amigurumi patterns. This method is special because it doesn’t need sewing, saving you lots of time.
Benefits of No-Seam Design
The no-sew teddy bear method has many benefits. It makes the project easier and faster to finish. You won’t have to deal with the frustration of sewing, and your bears will look clean and neat.
Skill Level Requirements
No-sew Little Bear amigurumi making is for everyone, even beginners. You just need to know how to crochet a single crochet and how to increase and decrease. With these skills, you can make your own cute bear.
Time Investment
This easy Little Bear amigurumi pattern is quick to make. You can finish it in one sitting. It’s perfect for those with little time or who want a fast, fun project.
“It’s incredibly easy to follow and allows you to create adorable bears in no time at all. I’m hooked!”
– Sarah, Avid Crocheter
Essential Materials and Tools Needed
Starting your amigurumi bear project? You’ll need the right crochet supplies and tools. This guide will help you get everything you need to make your cuddly bear.
First, pick a high-quality, medium-weight cotton yarn. The 24/7 Cotton Yarn is great for amigurumi. It’s sturdy yet soft.
Next, choose a comfortable crochet hook, usually 2.75 mm. The Clover Amour Hook is a favorite. It’s ergonomic and easy to use.
- 2.75 mm Clover Amour Hook
- 7.5 mm safety eyes
- Lock ring stitch markers
- Fiberfill for stuffing
- Black embroidery floss for nose
You’ll also need sharp scissors, tapestry needles, and stitch markers. These tools help you build and finish your bear. They make your project look professional.
Want to try different looks? The pattern suggests using Go For Fleece Sherpa Yarn and Chenille Appeal Yarn. They add unique textures to your bear.
| Item | Description | Quantity |
|---|---|---|
| 24/7 Cotton Yarn | Level 4 worsted weight cotton yarn | 2 balls |
| Clover Amour Hook | 2.75 mm crochet hook | 1 |
| Safety Eyes | 7.5 mm in size | 2 |
| Stitch Markers | Lock ring stitch markers | Set |
| Fiberfill | Polyester stuffing | As needed |
| Embroidery Floss | Black for nose | 1 skein |
With these supplies, you’re ready to start making your bear. Let’s get crocheting!
Understanding Yarn Selection and Hook Sizes
Choosing the right yarn and hook size is key for crocheting an amigurumi bear. The main pattern uses worsted weight 24/7 Cotton Yarn. It offers the right mix of structure and softness for the bear. But, you can try other yarns to change the bear’s size and texture.
Recommended Yarn Types
The pattern suggests worsted weight cotton yarn. But, you can try other yarn weights and fibers for different looks. Here are some good alternatives:
- Go For Fleece Sherpa Yarn (jumbo weight, level 7) – This yarn is thick and works with a 6.5 mm hook. It makes a soft, cuddly bear.
- Chenille Appeal Yarn (thin worsted weight, level 4) – This yarn is soft and fuzzy. It makes a unique, huggable bear.
Hook Size Guide
The pattern recommends a hook size smaller than the yarn’s size. For 24/7 Cotton Yarn, a 4.5 mm hook is best. But, changing the hook size can change the bear’s size. Try different sizes to get the look you want.
Alternative Yarn Options
Feel free to try different yarns. Pick one that’s similar in weight and texture to the recommended ones. This way, your bear will keep its shape and size, even with different yarns. Just remember, the bear might look and feel different.
Free Little Bear Amigurumi Crochet Pattern
Explore the world of cute crochet with this free little bear amigurumi pattern. This guide will show you how to make a cute, no-sew teddy bear. It’s perfect for both new and experienced crocheters.
This pattern uses YarnArt Jeans yarn, a mix of 55% cotton and 45% acrylic. It makes a soft, cuddly bear about 10 cm (4.0″) tall. You’ll need a 2.25 mm crochet hook, 5 mm safety eyes, and a tapestry needle for a quality finish.
Pattern Details
- Finished toy size: Approximately 10 cm (4.0″) tall
- Crochet hook size: 2.25 mm
- Safety eyes size: 5 mm
- Number of stitches in legs (make 2): 10
- Number of rows for the body: 7 rows
- Total number of stitches for the body: 30
- Number of rows for head: 10 rows
- Total number of stitches for the head: 42
- Number of stitches for arms (make 2): 7
- Number of stitches for ears (make 2): 10
- Number of stitches for muzzle: 10
This step-by-step crochet guide uses special techniques for a smooth finish. It also shows how to place safety eyes and embroider the nose for a professional look.
“The amigurumi teddy bear crochet pattern is a true delight, perfect for adding a touch of sweetness to any space. With its easy-to-follow instructions and charming design, crafting this little bear is an absolute joy!”

Looking for a special gift or a fun crochet project? This free crochet bear pattern is perfect. It’s sure to capture your heart and bring joy to your crafting time. Start now and enjoy the magic of amigurumi teddy bear instructions!
Special Stitches and Techniques Guide
Starting your crochet journey to make this cute Little Bear Amigurumi? You’ll find many stitches and techniques to make it come alive. From simple steps to advanced tips, we’ll cover what you need to make your bear a masterpiece.
Basic Stitch Instructions
This Little Bear Amigurumi pattern uses classic stitches like the single crochet (sc) and slip stitch (sl st). You’ll also learn about decreases (dec) and increases (inc). Working in the back loops only (BLO) is key for a smooth bear.
Advanced Technique Tips
Want to make your Little Bear Amigurumi stand out? The pattern includes advanced techniques like invisible decreases and special stitches for the tail, arms, and legs. You’ll also learn how to work in continuous rounds and use front/back loops for a clean finish.
Looking to add your own twist? The pattern shows you how to change colors. Try a panda-inspired look or any colors you like to make it your own.
Learning these special stitches and techniques opens up new possibilities. It will improve your crochet skills and make your Little Bear Amigurumi a masterpiece.
Step-by-Step Head and Body Construction
Making a perfect amigurumi bear begins with the head and body. Start with an oval-shaped head from a foundation chain. Then, pick up stitches to form the body, making sure it’s well-proportioned.
First, create a foundation chain of 6 stitches. Join it into a ring without twisting. Next, make 6 single crochet stitches in the ring for the head’s base.
- Increase the stitch count by adding 2 single crochet stitches in every other stitch, reaching 9 stitches.
- Keep increasing until you have 24-26 stitches for the head.
- Work even rounds to keep the head oval-shaped.
Now, connect the head to the body. Pick up stitches from the head and work in continuous rounds. Follow the pattern for the exact stitch counts and placement.
| Step | Stitches | Description |
|---|---|---|
| 1 | 24 | Pick up 24 stitches from the head to start the body. |
| 2 | 28 | Increase to 28 stitches by adding 2 single crochet stitches in every other stitch. |
| 3 | 32 | Keep increasing to 32 stitches, following the same pattern. |
| 4 | 36 | Increase to 36 stitches, using the same method. |
Focus on the neck area for proper shaping and support. The pattern will guide you on the best technique and stitch placement.

With the head and body done, you’re almost there. Next, add the cute features that will make your amigurumi bear come to life.
Creating and Attaching Features
Making an adorable amigurumi bear is all about adding the right facial features and limbs. We’ll show you how to place the eyes and nose, make the ears, and attach the arms and legs. This will bring your crochet bear to life.
Eyes and Nose Placement
Safety eyes are key for a bear’s lifelike look. Place them between rounds 4 and 5, about 3 stitches apart. This makes sure the eyes are right in the middle and look good on the bear’s face. For the nose, use black embroidery floss to make a simple cross-stitch or French knot on the muzzle. It adds a cute touch.
Ear Construction Tips
The bear’s ears are crocheted right onto the head. Start them on round 6, using bobble stitches in the front loop only. This gives the ears their shape and texture. Make sure to place the ears so they look balanced and even.
Arms and Legs Assembly
The arms and legs use the same bobble stitch as the ears. They’re worked into the bear’s body, so you don’t have to sew them on. Just keep crocheting, adding and subtracting stitches as needed. This makes a bear that’s easy to make and looks great.
With these tips, you can make a cute amigurumi bear that will win hearts. Take your time and enjoy making it. The joy of creating something with your hands is what makes this project special.
Size Modifications and Customization Options
Get creative and make your little bear amigurumi your own. The choices are endless!
Larger Bear with Go For Fleece Sherpa Yarn
Want a bigger bear? Use Go For Fleece Sherpa Yarn instead of velvet or chenille. It’s a #5 (bulky) weight yarn. A 6.5mm (K) hook will make it taller and bigger. This yarn makes a bear that’s soft and perfect for hugs.
Smaller Bear with Chenille Appeal Yarn
Like a smaller bear? Try Chenille Appeal Yarn, a #3 (DK) weight yarn. Use a 3.75mm (F) hook. This will make a smaller, detailed bear great for showing off or as a gift.
Panda Variation with Color Change
Make your bear look like a panda with a color change. Use Color A for most of the body. Then, switch to Color B (black) for ears, face, and paws. This will make a cute panda amigurumi.
Feel free to try different yarns and textures for your bear. Just remember to change the hook size to keep the right shape. This way, you can make your bear truly special and unique.
| Yarn Type | Yarn Weight | Hook Size | Bear Size |
|---|---|---|---|
| Go For Fleece Sherpa Yarn | #5 (Bulky) | 6.5mm (K) | Larger |
| Chenille Appeal Yarn | #3 (DK) | 3.75mm (F) | Smaller |
Crafting is all about making things your own. Enjoy making your little bear amigurumi special. It will be a keepsake that’s truly yours.
Stuffing and Finishing Techniques
As you near the end of your crochet project, it’s important to focus on stuffing and finishing. When stuffing amigurumi, use a light touch. Overstuffing can make your plush toy stiff and bulky.
Stuff the body and limbs with small amounts of fiberfill or polyester. Gently push it into corners and crevices to keep the shape right. Don’t pack it too tight to avoid distorting your plush toy assembly.
Once stuffed, it’s time for the finishing touches. Weave in any remaining ends and close openings with a needle and thread or a slip stitch. This makes your bear look better and last longer. You can also add a small keychain or loop to the head for extra fun.