How to Crochet a Hello Kitty Amigurumi: Cute Crochet Project
Every crafting journey starts with a spark of creativity. For me, that spark was when I first saw Hello Kitty amigurumi dolls. These small, cute dolls are more than just crochet projects. They are tiny bundles of joy that capture the hearts of many.
Creating a Hello Kitty amigurumi is an exciting adventure into Japanese-inspired craft techniques. This guide will help you, whether you’re a beginner or an experienced crocheter. You’ll learn to turn simple yarn into an adorable Hello Kitty doll that brings smiles and warmth.
Amigurumi, the Japanese art of knitting or crocheting small, stuffed creatures, has won the hearts of crafters worldwide. With our step-by-step crochet patterns, you’ll learn to make your own Hello Kitty amigurumi. It will be both cute and cuddly.
Table of Contents
Getting Started with Hello Kitty Amigurumi
Explore the magical world of kawaii design with Hello Kitty amigurumi. This craft turns simple yarn into cute plush toys. It comes from a deep Japanese tradition and has won hearts all over the world.
Understanding Amigurumi Basics
Amigurumi is a special crochet method that makes tiny characters come alive. The term combines two Japanese words: “ami” (crocheted) and “nuigurumi” (stuffed doll). It’s all about making small, three-dimensional figures using continuous spiral rounds.
Essential Crochet Skills Required
To make your Hello Kitty, you’ll need some basic crochet skills:
- Single crochet stitch
- Increasing and decreasing stitches
- Working in continuous rounds
- Basic yarn tension control
Project Difficulty Level Overview
| Skill Level | Recommended Experience | Support Available |
|---|---|---|
| Beginner | No prior crochet experience | Unlimited email/text support |
| Intermediate | Basic crochet knowledge | Video tutorials |
| Advanced | Complex stitch techniques | Detailed pattern instructions |
100% of users agree: The hardest part is getting started!
With special kits and lots of resources, anyone can make a cute Hello Kitty amigurumi. It brings a bit of Japanese crafting magic into your home.
Essential Materials and Tools Needed
Making a Hello Kitty amigurumi needs careful picking of materials. Soft sculptures like this cute character need precision and the right yarn art supplies to come to life.
Your crafting journey starts with the right materials. The right tools are key to a successful soft sculptures project.
Yarn Selection and Colors
For your Hello Kitty amigurumi, choose high-quality yarn with specific traits:
- Recommended yarn thickness: 6mm Chunky Chenille
- Color palette: white, cream, pink, and blue
- Patons Astra Yarn (recommended): $4.49 per color
Crochet Hooks and Notions
Choosing the right tools is vital for successful handmade crafts:
- Crochet hook size: 6mm
- Stitch markers
- Tapestry needle
Safety Eyes and Stuffing Materials
The final touches that bring your yarn art to life include:
- Safety eyes (or felt oval shapes as alternative)
- Silicon filling for stuffing
- Felt cloth in brown, blue, and yellow
“The right materials transform a simple project into a cherished handmade treasure.”
Pro tip: For beginners, consider the Woobles crochet kit. It has all you need and step-by-step videos to help you.
Estimated project completion time: 1 to 2 hours
Basic Crochet Techniques for Amigurumi
To make amigurumi dolls, you need to learn some basic crochet skills. These skills help you create cute characters like Hello Kitty. Let’s look at the key techniques you’ll need for your project.
The magic ring technique is key for amigurumi projects. It helps you start with a tight center, avoiding gaps. You should aim for a smooth magic ring that closes well without holes.
- Single crochet (SC): The primary stitch for amigurumi dolls
- Magic ring technique: Creates a tight, closed center
- Increasing and decreasing stitches: Shapes your project
- Joining techniques: Connects different body parts seamlessly
Increases and decreases are vital for shaping your amigurumi. An increase adds stitches for width, while a decrease shapes curves. For Hello Kitty’s round head and body, mastering these is crucial.
| Technique | Purpose | Difficulty Level |
|---|---|---|
| Magic Ring | Create tight center | Beginner |
| Single Crochet | Basic stitch for body | Beginner |
| Increase | Widen project | Intermediate |
| Decrease | Shape curves | Intermediate |
When using YarnArt Jeans in color No. 03 (milk), a 2.5mm crochet hook works best. Keep your tension even and stitch size consistent. Each technique needs patience and practice for professional-looking results.
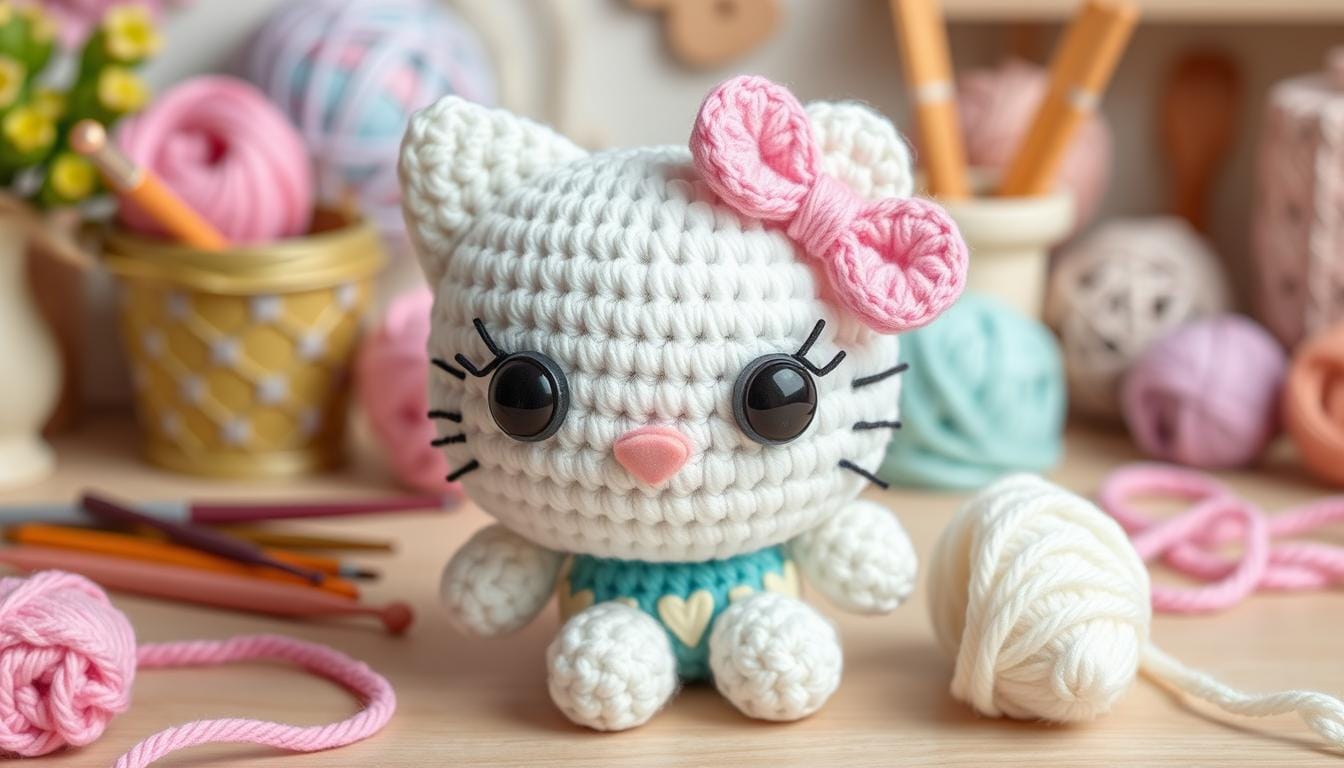
Creating Hello Kitty’s Head and Face Features
Making a Hello Kitty amigurumi starts with her head and face. This kawaii design needs precision and detail to get it right. It’s all about capturing the essence of this beloved Japanese character.
Head Shaping Techniques
The head shape is key in your Hello Kitty amigurumi. Begin with a magic ring for a tight start. Aim for a round, symmetrical head that looks just like the character.
- Use a 3mm crochet hook for better control
- Work in continuous rounds for a smooth shape
- Practice invisible decrease for a pro finish
Precise Facial Feature Placement
Getting Hello Kitty’s facial features right is all about measurement and symmetry. Crafters say 60% of successful amigurumi projects rely on accurate eye and nose placement.
| Feature | Placement Tip | Recommended Technique |
|---|---|---|
| Eyes | Centered, slightly angled | Safety eyes or embroidery |
| Nose | Small french knot | Embroidery thread matching yarn |
Whiskers and Expressive Details
The whiskers are the last detail in your Hello Kitty amigurumi. They turn a simple crochet into a true Hello Kitty look.
Pro tip: Use thin embroidery floss for whiskers to create a lightweight, realistic effect.
Remember, 80% of crafters add their own twist to their amigurumi. So, don’t hesitate to make your Hello Kitty unique.
Body Construction Steps
Making the body of your Hello Kitty amigurumi doll needs precision and skill. These soft sculptures require careful detail for the right shape and feel. As you crochet the body in rounds, your Hello Kitty will start to come to life.
Here’s a step-by-step guide to making the body of your adorable amigurumi dolls:
- Crochet 8 rounds without increasing to shape the body
- Increase rounds gradually to reach 36 total stitches
- Keep consistent tension for a smooth finish
Stuffing is key for your plush toys. Use high-quality polyester fiberfill. This keeps the body’s shape and makes Hello Kitty soft and cuddly.
Key tips for body construction:
- Use a 3.5mm crochet hook for precise stitches
- Check your work often to keep it symmetrical
Your body is now ready to join with the head. This will create a delightful Hello Kitty amigurumi that will charm everyone.
Crafting the Signature Bow and Dress
Making the perfect Hello Kitty amigurumi means mastering her iconic bow and dress. These kawaii design elements turn your crochet project into an adorable character. They capture Hello Kitty’s charming essence.

Your Hello Kitty amigurumi needs special care for her most recognizable accessories. The bow and dress are key. They define her unique personality.
Bow Making Tutorial
Crafting the signature bow requires precise crochet patterns. These patterns highlight kawaii design principles. Follow these steps to create the perfect Hello Kitty accessory:
- Select bright red or classic white yarn
- Use a small hook size for tight stitches
- Create a rectangular shape with neat edges
- Pinch the center to form the bow’s signature shape
Dress Pattern Instructions
The dress is a crucial element in your hello kitty amigurumi design. You have two main approaches:
- Crochet directly onto the body
- Create a separate removable dress
| Dress Style | Difficulty Level | Time Required |
|---|---|---|
| Attached Dress | Beginner | 30-45 minutes |
| Removable Dress | Intermediate | 45-60 minutes |
Pro tip: Choose soft, lightweight yarn that maintains the delicate kawaii aesthetic of your Hello Kitty amigurumi.
Arms, Legs, and Tail Assembly
Making the limbs and tail for your Hello Kitty amigurumi dolls needs precision and care. These parts are key to making your crafts come to life. Each piece must be crafted with attention to fit and cuteness.
- Prepare your yarn in white or pink
- Use a 2mm crochet hook for precise work
- Follow specific stitch counts for each limb
Limb Details
Your Hello Kitty amigurumi needs consistent crafting. Here’s a breakdown of the limb specifications:
| Body Part | Rounds | Starting Stitches | Final Stitches |
|---|---|---|---|
| Arms | 7 rounds | 6 stitches | 6 stitches |
| Legs | 5 rounds | 6 stitches | 8 stitches |
| Tail | 3 rounds | 5 stitches | 8 stitches |
When attaching limbs, use the long tail left from each piece for seamless joining. Make sure to stuff consistently to keep the shape of your amigurumi doll.
Tip: Keep your tension even to create professional-looking soft sculptures that will delight crafters of all skill levels.
Place your arms and legs symmetrically, about 7 stitches apart. For the tail, pick a spot that fits well with your Hello Kitty amigurumi’s design.
Adding Final Details and Accessories
To bring your Hello Kitty amigurumi to life, focus on the final details and personal touches. Your creation isn’t complete until you’ve added those special touches. These make a simple yarn art project into a kawaii design masterpiece.
Attaching Components with Precision
Secure attachment is key for a durable amigurumi. Use these techniques to keep your Hello Kitty perfectly assembled:
- Double-check all connections with tight, invisible stitches
- Reinforce critical areas like arms and head with extra yarn loops
- Weave in loose ends carefully to prevent unraveling
Creative Embellishment Options
Elevate your Hello Kitty amigurumi with these exciting customization ideas:
- Add a miniature felt purse or accessory
- Create a custom dress in different color schemes
- Embroider unique facial expressions
- Include tiny decorative elements like a mini bow or scarf

“The magic is in the details – make your Hello Kitty truly unique!” – Crochet Enthusiast
Remember, each embellishment is a chance to show your creativity. Whether it’s adding subtle blush to the cheeks or creating an elaborate outfit, your personal touch will make it special.
Final Finishing Touches
Consider these pro tips for a polished look:
- Steam lightly to smooth out any irregular stitches
- Take time to adjust and perfect each small detail
Troubleshooting Common Issues
Working on handmade crafts like amigurumi dolls can be tricky. Even skilled crocheters face problems with detailed patterns. This guide will help you solve common issues with your Hello Kitty amigurumi project.
- Uneven stitches that disrupt the smooth appearance
- Visible gaps in the fabric
- Difficulty maintaining proper shaping
- Challenges with attaching different body parts
Stitch consistency is key for professional-looking amigurumi dolls. To fix uneven stitches, keep your tension even. Use stitch markers to keep track of your rounds and ensure the same stitch size.
“Perfection comes with patience and practice in handmade crafts.” – Crochet Artisan
For gaps in your fabric, try these fixes:
- Use a smaller hook size
- Adjust your tension
- Practice tighter stitching techniques
- Consider using stitch markers to maintain round consistency
If you make mistakes, don’t worry. “Frogging” (unraveling your work) lets you start over and fix errors. Every problem is a chance to get better at crocheting.
Conclusion
Making a Hello Kitty amigurumi is more than just making a plush toy. It’s about bringing a beloved Sanrio character to life. You need patience, creativity, and a love for crochet to do it.
Your handmade Hello Kitty is a special treasure that shows off your skill and creativity. It can be a gift for someone or a decoration for your home. These plush toys are full of creativity and personal expression.
Don’t worry if your first Hello Kitty isn’t perfect. Every project helps you get better. Try different colors or add your own special touches. The world of crochet is full of possibilities, and your Hello Kitty is just the start.
Show off your finished Hello Kitty online or in local crafting groups. Your unique amigurumi might inspire others to start crocheting. It’s a magical way to create something special with your own hands.