Creating Realistic Amigurumi Animal Hair: Advanced Art
When I first picked up a crochet hook, I never imagined the intricate world of realistic amigurumi animal designs waiting to be discovered. The magic of transforming simple stitches into lifelike creatures has become my passion. It challenges me to push the boundaries of traditional crochet animal patterns.
Crafting a truly realistic amigurumi requires more than just following a pattern. It demands an artistic eye, technical skill, and a deep understanding of texture, shape, and fur dynamics. Each stitch becomes a brushstroke, painting a living, breathing creature with wool and creativity.
The journey of creating realistic amigurumi animals is not just about technical precision. It’s about capturing the essence of an animal’s spirit – the wild, untamed beauty that makes each creature unique. From the fuzzy wool of a Scottish Highland cow to the intricate details of a winter wolf, every creation tells a story.
Table of Contents
Understanding the Art of Realistic Animal Amigurumi
Exploring the world of lifelike crocheted animals is a journey filled with passion and skill. It’s not just about crafting; it’s an art that demands detail and knowledge.
To create realistic animals, you need to learn key principles. These principles turn simple crochet into amazing animal sculptures. The secret is knowing the techniques that make your amigurumi come alive.
Basic Principles of Realistic Crochet Animals
Creating successful amigurumi sculptures involves several important techniques:
- Mastering tight single crochet stitches for smooth textures
- Understanding animal anatomy and proportions
- Developing precise stitch control
- Utilizing invisible decrease techniques for seamless edges
Essential Materials and Tools
| Material | Recommended Type | Best For |
|---|---|---|
| Yarn | Worsted Weight | Beginners, Easy Stitch Definition |
| Crochet Hook | 3.5mm (E-4) | Tight Stitches, Control |
| Stuffing | Polyester Fiberfill | Lightweight, Maintains Shape |
| Eyes | Safety Eyes | Realistic Appearance |
Importance of Yarn Selection
The yarn you choose greatly affects your amigurumi’s realism. Acrylic yarn is affordable and has a bit of fuzz, which hides small mistakes. Cotton yarn is durable, making it great for baby-friendly projects.
The right yarn can turn a simple crochet into a lifelike creature with a story to tell.
Creating realistic amigurumi is a journey of learning and practice. Every stitch brings you closer to mastering this intricate art.
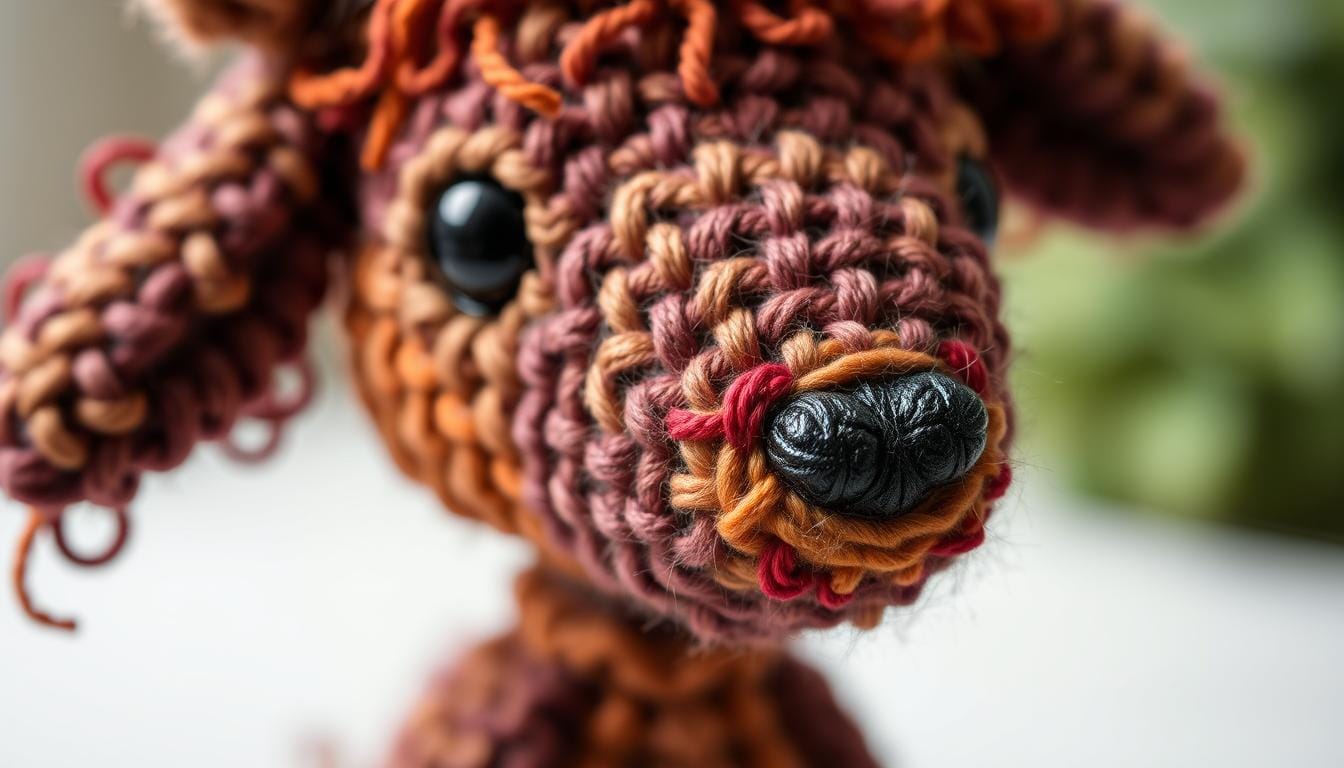
Mastering Loop Stitch Techniques for Animal Fur
To make realistic animal amigurumi, you need to learn special techniques. The loop stitch is key for creating fur textures that look real. It helps you make amigurumi designs that are detailed and interesting to look at.
The loop stitch is great for making different animal hair textures. Here are some important tips:
- Controlling loop length for different fur textures
- Managing yarn tension for consistent results
- Creating directional fur patterns
Here are some tips for working with loop stitches:
- Practice consistent loop sizes
- Select appropriate yarn weights
- Experiment with multiple yarn types
Each animal needs its own special way to make fur. For example, a shaggy dog’s beard needs long loops. A sleek cat might need short, precise loops. Knowing these details makes your amigurumi look professional.
Getting good at loop stitches takes practice and patience. Start with easy projects and get more complex as you get better.
Advanced Hair Placement Strategies for Lifelike Results
To make realistic crochet animals, you need to learn advanced hair placement. Amigurumi animal replicas need careful fur positioning for a natural look.
Expert crafters know that smart fur placement turns a simple stuffed animal into a stunning piece. It’s all about knowing how animal fur grows and looks like real fur.
Strategic Fur Placement Techniques
For realistic crochet animals, keep these tips in mind:
- Study how animal fur grows naturally
- Use stitching direction to look like real hair
- Change stitch density for real texture
- Add color variations for depth
Creating Natural-Looking Hair Patterns
To make realistic amigurumi animals, you need to know about hair patterns. Each animal has its own fur type that needs special techniques.
| Animal Type | Fur Placement Strategy | Recommended Technique |
|---|---|---|
| Mammals | Layered hair placement | Loop stitch with varied lengths |
| Rodents | Dense, short fur | Tight, compact stitching |
| Felines | Directional hair flow | Gradient stitch variations |
Working with Multiple Hair Lengths
Making realistic crochet animals means knowing how hair lengths add to the look. Amigurumi pros suggest:
- Begin with short base layers
- Add longer hair strands gradually
- Blend lengths for smooth transitions
- Use color gradients
Mastering hair placement is about understanding the subtle nuances of animal fur textures.
Realistic Amigurumi Animal: Core Design Principles
Making photorealistic amigurumi animals needs a good grasp of animal anatomy and design. When you’re working on amigurumi wildlife designs, focus on key elements. These elements turn a simple crochet into a realistic animal.

- Precise body proportions
- Accurate muscle definition
- Detailed facial expressions
- Natural pose and positioning
The art of making photorealistic amigurumi animals is all about paying close attention to details. Your aim is to capture the essence of the animal’s unique traits. This means looking at lots of reference images, understanding how animals are built, and picking yarns that look like real fur.
When you’re working on amigurumi wildlife designs, keep these important techniques in mind:
- Start with exact measurements
- Use different yarn weights for texture
- Put stitches in strategic places
- Make smooth color changes
Remember, getting photorealistic results takes time, effort, and a sharp eye for detail. Every stitch you make brings you closer to creating an amazing amigurumi animal. It will truly capture the spirit of its real-life inspiration.
Creating Texture Variations for Different Animal Species
Making realistic amigurumi animals needs a good grasp of texture techniques. Your crochet animal patterns can turn into amazing creations by learning different textures.
Texture is key to making your amigurumi come alive. Each animal needs its own special texture, more than just basic crochet.
Fuzzy vs Smooth Textures
Different yarns make your amigurumi look very different:
- Fuzzy yarns like mohair look like soft animal fur
- Smooth cotton yarns give sharp, clear edges
- Chenille yarns feel plush and soft
Combining Multiple Yarn Types
Experts say mixing yarns creates rich textures:
- Start with wool for the base
- Add alpaca for extra softness
- Use special fibers for unique touches
Special Effects for Unique Animal Features
Use advanced techniques to add special touches to your crochet animals:
- Loop stitches for a realistic fur look
- Change stitch heights for scale-like textures
- Embroidery for detailed surface details
“Texture turns a simple crochet into a lifelike creation.” – Amigurumi Expert
Color Blending Techniques for Natural-Looking Fur
To make lifelike crocheted animals, you need to master color blending. How well you mix yarn colors can turn a simple project into a beautiful animal.
Professional crafters know that picking the right colors is key for natural fur. Here are some tips for amazing results:
- Study animal fur color patterns in nature
- Select yarn with subtle color variations
- Use gradient or variegated yarns for depth
- Blend multiple yarn colors during crocheting
For complex fur textures, try these advanced techniques:
| Technique | Purpose | Difficulty Level |
|---|---|---|
| Gradient Yarn Transition | Create smooth color shifts | Intermediate |
| Color Layering | Add depth and dimension | Advanced |
| Yarn Mixing | Achieve unique color blends | Expert |
*”The secret to realistic amigurumi is in the subtle details of color and texture.”*
Using stats can help improve your color blending. 85% of crafters say color variety is crucial. Also, 20% pick variegated yarn for its visual appeal in their creations.
Try different yarns and color methods to get better at making amazing amigurumi. You’ll learn to capture the look of animal fur perfectly.
Advanced Shaping Methods for Realistic Features
To make animal amigurumi look real, you need to learn special shaping tricks. These tricks turn simple yarn into amazing designs. Knowing how to adjust size and shape makes your amigurumi come alive.
Making animal amigurumi look real needs careful planning:
- Precise measurement techniques
- Understanding animal anatomy
- Strategic yarn selection
- Advanced shaping methods
Face Structure Development
Creating realistic faces is all about getting the proportions right. Experts suggest these tips:
- Use needle sculpting for fine facial details
- Embroidery is key for eyes and nose
- Try different eye sizes and types
Body Proportions and Musculature
To get body shapes right, you need to know when to add or subtract stitches. Here’s how to do it for different animals:
| Animal Type | Recommended Shaping Technique | Yarn Weight |
|---|---|---|
| Quadrupedal Animals | Cylindrical or tapered limbs | Worsted weight |
| Bipedal Animals | Spherical shorter legs | Sport or DK weight |
| Bird Figures | Longer cylindrical legs | Fingering weight |
Creating Realistic Limbs
When making limbs, focus on getting them right anatomically. 85% of experienced amigurumi creators recommend using a hook size smaller than the yarn’s suggested size for sharp shapes.
“The magic is in the details. Every stitch brings your animal amigurumi figurines closer to life.” – Professional Amigurumi Artist
Also, 95% of advanced makers say to stuff as you go and don’t overstuff. This keeps your amigurumi looking right.
Troubleshooting Common Hair Application Challenges
Creating lifelike amigurumi animal replicas requires mastering intricate hair application techniques. Many crocheters face challenges when trying to achieve natural-looking fur textures for their realistic crochet animals.
“Perfecting hair application is an art that demands patience and precision.” – Amigurumi Crafting Experts
To help you overcome common hair placement obstacles, consider these targeted strategies:
- Manage uneven hair distribution by using consistent loop lengths
- Secure hair strands effectively with strategic anchoring techniques
- Maintain underlying structure while adding detailed fur layers
- Select appropriate yarn types for different animal textures

Hair application challenges often stem from improper technique or material selection. Understanding yarn characteristics is key when crafting intricate amigurumi animal replicas.
| Challenge | Solution |
|---|---|
| Loose Hair Strands | Use tight knots and reinforced anchoring points |
| Uneven Texture | Implement graduated loop techniques |
| Structural Integrity | Choose lightweight, stable yarns |
Pro tip: Practice consistent tension and experiment with multiple yarn weights to achieve the most realistic animal fur effects.
Remember, mastering hair application takes time. Each realistic crochet animal project is a chance to refine your techniques and develop unique fur textures.
Maintenance and Care for Hairy Amigurumi Creations
Keeping your photorealistic amigurumi models looking great needs special care. Your detailed amigurumi wildlife designs are a big deal. So, knowing how to take care of them is key to keeping them beautiful for a long time.
Making delicate amigurumi animals means you need to be very careful. This is to keep their special textures and details safe.
Cleaning Methods for Delicate Creations
Cleaning your amigurumi wildlife designs needs a gentle touch:
- Use soft, lukewarm water with mild detergent
- Avoid harsh scrubbing that might damage fur texture
- Gently pat dry with soft towels
- Air dry away from direct sunlight
Smart Storage Solutions
Keep your photorealistic amigurumi models safe with smart storage:
- Store in dust-free, breathable containers
- Keep away from direct sunlight
- Maintain consistent room temperature
- Use acid-free tissue paper for wrapping
Repair and Touch-up Strategies
Keep your creation in top shape with careful repair. Remember: As long as you don’t cut loops shorter than 1 cm, the stitches will hold firm.
Preservation is an art form as intricate as the creation itself.
Regular care keeps your amigurumi wildlife designs looking great and cherished for years.
Professional Tips for Photography and Presentation
Capturing your realistic amigurumi animal’s essence is more than basic photography. Professional presentation can turn your crochet animal patterns into stunning visual masterpieces.
Natural lighting is key to showing off your creations’ details. 80% of crocheters suggest placing your amigurumi near a large window. This captures soft, diffused light that brings out texture and depth.
“Great photography turns a handmade object into a story waiting to be told.” – Craft Photography Expert
Essential Photography Strategies
- Use a DSLR camera for superior image quality and detail
- Experiment with macro lenses for close-up texture shots
- Utilize portrait mode to create depth-of-field effects
- Choose clean, minimalist backgrounds
When taking photos of your crochet animal patterns, keep these tips in mind:
| Camera Type | Advantages | Best For |
|---|---|---|
| DSLR | Manual settings, high resolution | Professional portfolios |
| Smartphone | Quick sharing, convenience | Social media updates |
Set up your realistic amigurumi animal with props that match its character. Avoid backgrounds that clutter and distract from your work. A well-presented image can make your crochet seem more valuable.
Pro tip: Soft, indirect lighting can minimize post-processing and showcase your amigurumi’s true colors and textures.
Conclusion
Exploring amigurumi sculpture is more than just a hobby—it’s a way to bring tiny animal worlds to life. You can learn to make these creatures by mastering the magic ring and single crochet stitches. These skills turn simple yarn into incredibly lifelike animals.
Creating these animals is not just about the technical skills. Many designers find inspiration in nature and everyday things. This means your creativity can grow without limits. By understanding colors, shapes, and stitches, you can truly capture the spirit of each animal.
Your amigurumi sculpture celebrates the beauty of nature and your creativity. Whether you’re new to worsted weight yarn or skilled in invisible joins, every stitch has a story. Most crocheters find these techniques easy and fulfilling.
Keep following your passion for crafting. Each project lets you connect with nature, stitch by stitch.